Showing posts with label No-sew project. Show all posts

Thursday, March 14, 2013

Cleaning up the Cards

I've disappeared again, haven't I? I have been feeling so buried by life. And it's my own doing. And sadly, it's not life as in activities, volunteering, etc. (though I have done some of those too). It's my mess and my lack of finishing projects. Every once in awhile I swear I have ADD. Not the bouncing off your seat kind, but specifically ADHD-I (because the term ADD is actually outdated). Can you tell I've done my research? Basically, to sum it up unscientifically, I'm calm and quiet, but I cannot focus on tasks very well. I'm not saying I actually have it, but it all sounds so familiar when I read the symptoms and attributes of those who do have it. 

I WANT to multi-task, but I shouldn't really because then I get only a morsel of 10 things done and the resulting mess from started projects is all over my house. I have literally dozens of tabs open on my window browser at once. I have so much to work on that I get nervous about it (weird, I know) and don't know where to begin.

Thankfully I'm not always like this. It's just when I feel particularly buried. Which is right now. It's the switching out seasons and sizes of clothes time. Getting rid of maternity clothes and baby clothes. Trying to keep up on laundry for 6 people. Trying to make sure we have good tasting and healthy meals every night. Trying to be a fun mom while still doing my projects (my family blog is still not caught up from Christmas). And don't even get me starting on cleaning! I love to think and love new ideas and my mind goes crazy just wanting to to them all, but then it gets so filled with that, that I do so very few of those things I get excited to try out.

Ahhh, it's nice to have that out. (And for the record, as I type this I am thinking about about 15 other things I should/could be doing.)
 My latest project has been scanning papers. I hate papers and am a total paper junkie. It's a problem. I love the idea of having less of everything, with paper junk high on that list. I'm making progress, but the project has taken over my living room. I set up our laptop and scanner in there to be able to be by the kids, have more room to spread out, and leave the desktop computer available for my husband to play Civilization at night.
I'm a sentimental sap and I like having physical reminders of memories and moments in time. I used to scrapbook until I just got way too far behind.Several years ago I asked a very organized friend what she did with old Christmas cards and things like that. Despite being a minimalist, she also preferred to keep her cards versus just tossing them out. Her solution was to punch holes in them and put them in 3-ring binders. I've seen similar ideas in the last year or so on Pinterest. Such as this and this. My binder worked for awhile, until it wasn't caught up anymore and I had stacks of cards around. I decided I just wanted to end all the paper stuff and came up with a genius plan. (Is that okay to say one of your own ideas is genius?)
So I made a private blog! I am the only person who has access to this. I scan the cards, create a post for it, categorize it based on whether it was was a wedding announcement, thank you card, Christmas card, etc. I also label whether it was from family or friends. On the thank you cards that match up with something I made for that person, I also add a picture of the item. Or, if it is a wedding invite, I add a photo from the special day. Doing this has given me peace of mind that I can be sentimental and not keep all the actual crap. The blog is super organized and I try to post-date everything so it serves as a timeline of the events. I love it. Now I need to get back to scanning so my family can have the front room back.
(Also scanning kid papers, which is a whole other project that I am far behind on!)

Friday, June 15, 2012

Jewelry Rookie

Like I mentioned in my last post, I have been wanting to try my hand at making my own jewelry. I had gotten some ideas online and one that I wanted to tackle first was this Momma Bird Necklace. It seemed doable and since I am not planning on having anymore kids once my October baby is born, I wanted to make one with all 4 birthstones.
First thing I did was go to Michael's with coupon in hand. I got some basic jewelry tool set, wire, chain, and "findings" (which I think is a hilarious way to describe the different pins and what-not needed for jewelry making). I didn't like my bead choice there for this particular project, so I headed to a bead store near my house that my mom recommended to me. I was in there forever trying to pick out my beads. And, it turns out the store is closing, so all the lose beads were 50% off. If I can get the hang of this I will likely go back and get more (with solid ideas in mind) and get them before they are gone.
So, last night I decided to be brave and make the necklace. I had been wanting to check out Downton Abbey because I swear everyone says it is good, so I put it on and got out my new supplies. First attempt at the necklace was just not good. I like the tutorial linked above, but I am pretty sure it was not made for people who have never touched jewelry supplies before Version one was too loose in some spots and too tight in others. I took it apart and tried again. Although it isn't perfect (and I really wish I found birthstones that looked more like eggs), I think it turned out okay. So, moral of the story - don't be afraid to try something new. :)

Saturday, January 7, 2012

Wreath=Done

 I got the wreath done and on the door.
I don't love it. It seems to plain, but I really have no idea what I am doing. Suggestions?


Sunday, January 1, 2012

Hello

Hello, nearly forgotten about blog. I remember that you are here and I keep meaning to utilize you for more things. I have a folder full of project I did months and months ago (some even a year ago!) that I haven't put up. In part it is because I am doing other things (aka lazy) and also because somethings I fell like I need all these photos instead of just a final project, which is usually all that gets photographed. I hope to visit you more often this year, blog. 
I have a few other hopes for the year too. I haven't made resolutions in eons, but for some reason this year I feel like I really am wanting to turn over a new leaf. Could it be that 35 is looming ahead just a few month away? Maybe subconsciously. Is it because I feel suffocated in my house with all these unfinished projects, do-tos not done and just too much stuff? For sure. 
  • One of my biggest goals for 2012 is to be better at managing my time, to be organized at least enough that I don't feel so scatterbrained. 
  • I want to finish a slew of projects or just toss them out.
  • I want to live my life in a more focused way. (If you have not read Organized Simplicity by Tsh Oxenreider, you should now. It's about living a better life, not just cleaning stuff.)
There are other ideas I am toying with putting on my "official" list, but I don't feel like I need/want to share them here. So, let me just end my post with something I made so that I feel like I am getting the blog back on track...
I made some freezer stencil shirts at the end of the summer. I don't make them often enough and they are incredibly easy. (Well, I still don't love the xacto knife work and long for the simplicity of a Silhouette machine, but alas...)
 Bike for the hubby who loves to mountain bike (a little too high on the shirt, but now I know for next time).
For the son that prefers a scooter over his bike, a scooter. A revers of dad's bike for the son who loves to ride is bike too.
So, I hope to be back again soon. :)

Tuesday, June 28, 2011

Stars and Stripes

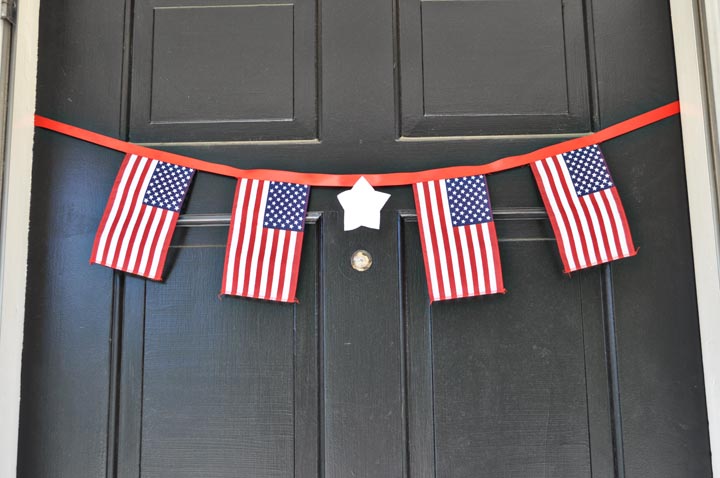
Um, hi. I have gone missing again. At least I have been working on projects while ignoring you. :) I've never been great at having cutesy things on my door, but I like the look of a nice wreath, etc. It seems like I get more and more happy for the 4th of July every year and I've finally done something to show my feelings...
It's simplistic, but does the trick. And It was easy and cheap! I just bought a 4 pack of flags at Wal-Mart for $1 (or where ever you like, but some have less in the pack for the same cost), removed the "pole" and glued the flags on a ribbon. The fabric star in the middle I plan to replace with something a little studier, or maybe fabric again but double-sided to make it stronger and less likely to curl on the edges.
The little banner on the door was definitely a great addition to the two measly flags hanging out by the steps. Someday I'd love to have a bigger house and decorate it all nice and have the fun patriotic swag banners outside from Flag Day to Independence day. But for now, I am happy with how I have set up our doorstep.

Wednesday, May 4, 2011

Lace Headbands

 
My daughter has started protesting against wearing headbands. I put them on and she pulls them right off. This little charade reminded me that I never posted the headbands I have made. I'm using the term loosely, as really it is just a piece of elastic lace glued together. 
 I'm not into big bows and flowers and prefer something much smaller (even that black bow is big to me) ot nothing at all. My sister has 3 daughters and gave me a simple white lace headband when my baby was born. On it was a small loop of ribbon so that, if desired, a bow could be attached and I could mix and match. I have only made one set of bow clips (the brown above). I have supplies for more but...you know how I work. ;)
If you are wondering at all, the place I bought the elastic lace is called Lace Heaven. I know some people don't like the lace look, so there is always the option of buying soft fold-over colored elastic (which I would love to try!). I learned about it on one of my favorite sewing blogs, Make it & Love it.

Thursday, April 7, 2011

Eastery Window

I was recently visiting a blog I had never been to called Be Different Act Normal. Among many cute ideas they had posted was this one of an Easter egg garland they found on Family Chic. I thought it was such a fun and easy idea. And who doesn't have too many plastic eggs sitting around from years past? So, I took this idea and made it work for me.
 Last Saturday it was in the 70s here and truly spring had arrived. There were blossoms on the neighbor's tree and some of my daffodils were in bloom, so I thought it was a good time to get decorated for Easter. I did no decorating last year, so I figured I had to this year. (Plus, my kids are ultra excited about it thanks to a fun Easter egg hunt we do at my parents' house every year.)
So. if you clicked on either of the links above you'd see that the garland was made with yarn snapped between the eggs. Very simple. I didn't have any pastel yarn and didn't want to go out and buy any, so I changed the idea. I have a lot of ribbon you'd use for wrapping gifts in colors that I never use. I knew it wouldn't curve all nice like yarn can, so I made mine as strips.
Just lay the ribbon across the open egg and snap shut. 
Then you will probably have to bend the ribbon a bit if you use wide stuff like I did. This probably won't be a problem for thinner ribbon and probably not for fabric ribbon or yarn either.
Then add another in the same fashion at whatever distance you like and keep adding until it is as long as you want it to be.
And ta-da, easy Easter decorating!
And still pretty (maybe even more so) when it snows the next day! 
I know spring is wild, but a 40+ temperature drop resulting in snow in 12 hours? Wow! It's gone now, in case you were wondering...

Tuesday, February 15, 2011

Dress-up Case

When I saw this idea on A Girl and a Glue Gun last spring I decided I must make one. I thought it was such a clever idea and created a way to put a cap on the number of dress-up items to have. (Well, ours might not all quite fit in it!)
I found an old suitcase at the thrift store. It was in pretty decent shape as far as the exterior and the latches were concerned. Plus, it was only $3 or something like that.
The inside was falling apart, but that didn't matter since it would be torn out anyway.
I covered up the shiny parts of the suitcase with tape and then went to town with some red spray paint. 
As you can see it didn't cover perfectly even, but I like it. (Maybe I needed more coats or else I am just not a good spray painter). And you can see in the picture below that the handle is black. I just used a permanent marker for that.
I didn't photograph the process of adding new lining, but the original tutorial does a great job. My glue gun broke in the middle of the process, so mine is have hot glue and half some kind of tacky fabric glue. It wasn't hard to do though.
I love having this as a place for my boys to put their play clothes. There are a few Halloween costumes in there that are WAY too small for them, but they still try to wear them and play with them. 

And if you are looking for something more ambitious and really cute that also displays the dress-ups, you have to see this storage set up.

Friday, May 21, 2010

Necklace Projects

Remember when I said I was going to make these necklaces? Well, I did awhile back and I just haven't posted yet. I found the pearl ribbon necklace here.I pretty much just did a practice run with the necklace to prep for teaching the girls, but I haven't tried to perfect it.
Here are the basic supplies needed. You could use any kind of bead and there are lots of styles of ribbon to choose from. I imagine there are a lot of methods to actually stringing the beads. I just tried out different distances between beads to get different effects.
I actually don't know that this is something that I will really wear much, but it was fun to trey something new. More importantly, the girls I was helping make them seemed to like it, despite the challenge it was for them.
The other necklace project was the stamped washer necklace. I have not made these with the girls, and so far my first attempt was my best. I used this tutorial.
I liked that I had colored Sharpies and so there were more options to choose from to fill the letters in. Also, if you notice, the first "e" is a little shallow. You can go back and res-tamp it to get it deeper, just make sure you line it up all nice and tight.
And I'd recommend doing your stamping on concrete so it is extra solid, just make sure to put something behind the washer so it doesn't get all scratchy on the back.
String it up, add a clasp (on in my case two knots so it can slide to different lengths) and you are good to go.

Thursday, January 7, 2010

Baby Gifts

My cousin's girlfriend had a baby girl and I wanted to get them a gift. I was in another one of those "I need to make it not buy it" moods, so I tried out some projects I'd seen online.
First up was a picture holder. I got this from an episode of Martha Stewart and had a several already made and ready as gifts (minus pictures).
You hang the photo cards on a shower ring and then add a few plastic links so it can be attached to a car seat or stroller for baby to look at and not lose. I added patterned paper to the backs as something else to look at (black and white is supposed to be stimulating to a baby's eyes), plus I didn't have anymore pictures to put in.
Next up (and super easy to make!) was a crinkly soft toy. I saw this idea on Chasing Cheerios last fall and saved it to do later. I skipped the ribbon tags though.
The last gift was an I-spy bag. I have seen these all over and wanted to make one and like this idea from Make it and Love It where they are in fun shapes.
I sewed on a little ring so the plastic rings could hook on and be used for the stroller or carseat as well. I need to get a coupld of these made for my boys. I have lots of supplies to make more, so if you want one, I know a girl who knows how to make them.

Wednesday, July 29, 2009

Ribbon Belt

I have not touched my sewing machine and barely even looked at in months! And this was a no-sew project, so the machine is still gathering dust, despite my dozen and dozens of ideas and unfinished projects! I bought some shorts the other day that came with a belt that, although cute, doesn't really match anything I have. So, I decided to make a very simple (and more decorative than useful) one.
I went to the fabric store and picked up some D rings and a wide ribbon. Since I am super cheap, I wanted the belt to be removable from the rings, so I avoided my machine. There are a few ways to do this project. You can use velcro or snaps.
I thought the snap would hold up better and I already had the snaps and snap gun. To seal the end you can burn it or use glue. I know there are some fancier no-ravel type products, but I think glue will work just fine for this. I guess we will see. Because of the design on the ribbon I couldn't melt the end because it was just burning the paint.
I think it turned out cute, but I forgot that with D-rings that the end needs to be reversible. Thankfully there are 2 ways to loop them and I could hide the tail behind. Also, the ribbon was just too thin. Using a different fastener instead of the D-rings would have probably worked beter with the ribbon.