Showing posts with label craft. Show all posts

Friday, January 11, 2013

Wreath - How To, Sort Of

So, I have posted on the right side of the blog the top pages visited. They were all mostly related to Halloween costumes and then a post that includes a onesie with a Richard Scarry character on it. In the past month or so my wreath I made last year has joined the list.
A few months ago on Pinterest my cousin pinned a wreath that looks a LOT like this one. Crazy thing? It wasn't mine. It wasn't anyone I knew and she didn't know me. The look a little different, but the stars were lining up in some crazy way last January because we made and posted them around the same time.  Anyway, I commented on her post about how like-minded we were and that I liked how the wide tulle on hers looked better than mine and linked back here. So, I think people are coming here from that link. I really don't know, but not that many people read the blog, so that's all I can figure.
I don't know if that has happened to you before (not necessarily though a blog, but just generally), but I have seen it and experienced it a few times. I read several sewing blogs. It seems like often some of my favorites will happen to post about the same exact idea. I don't believe they are copying each other, there is just something in the air. One blogger even commented on it once, though I can't remember which.
I remember when I was in high school I used to think of these ideas and have my mom make them for me. (Both of my parents are very creative and skilled. Growing up I loved that they could take my ideas and make them a reality...maybe more on that in another post.) Anyway, my mom had all this terry cloth fabric and I thought it would be awesome to make some PJ pants out of them, so my mom and I made those along with a pair that had ric-rac for the drawstring and beads on the end. (I don't recommned ric-rac for a drawstring, too hard to pull.) Anyway, a month or so later, I saw terry vloth pajamas in the store. So, was my idea my own or one I had just seen and forgot? That just can't be answered. 
So, back to the wreath, as far as I know, I didn't copy anyone on this idea and if I did see it somewhere and used it, I would definitely give credit to whomever inspired me. That's just what I do. Now, the reason I am even writing about this is to sort of show how my wreath is constructed. I tried to make it like this one from Kelly Hicks Design, but the tulle was NOT fanning like hers. Let me back up - supplies I used:
foam wreath thing
  • 2 packages of snowflake ornaments from Target
  • 1 roll of white tulle from JoAnn fabrics
  • glue gun
  • pins
 I first wrapped the foam ring in tulle and glued it down and the beginning and end. Then I glued down my snowflakes. 
 If you see my original post, I had planned on that being my wreath, but it looked lame. So, I tried the pretty ruffles like the Kelly Hicks wreath linked above. It wouldn't work. So, I just made fans.
 I can't remember the dimensions of each tulle piece, but you could play around with what you think looks best.
I pinned each fan into the foam. If I did it again I would choose all white pins instead of just whatever I pulled from the pin cushion.  I filled it with fans until I ran out of tulle. And that's that. It really is easy.

Monday, January 23, 2012

Update on the Wreath

I know you guys are just dying to know what I ended up doing with the wreath. (I know you aren't, but I still wanted to share.)
If my husband said it was too plain, than that certainly meant that it was. So, I added the rest of the tulle on, inspired by this wreath that my sister had pinned on Pinterest. I ended up just folding the tulle like fans and pinning it in.
So, here's the final product! I still don't love it, but I like it much better!

EDIT 1/11/13 - I just added a sort of "how to" to the blog since I have been getting so many visits to this post.  Go HERE.

Tuesday, June 28, 2011

Stars and Stripes

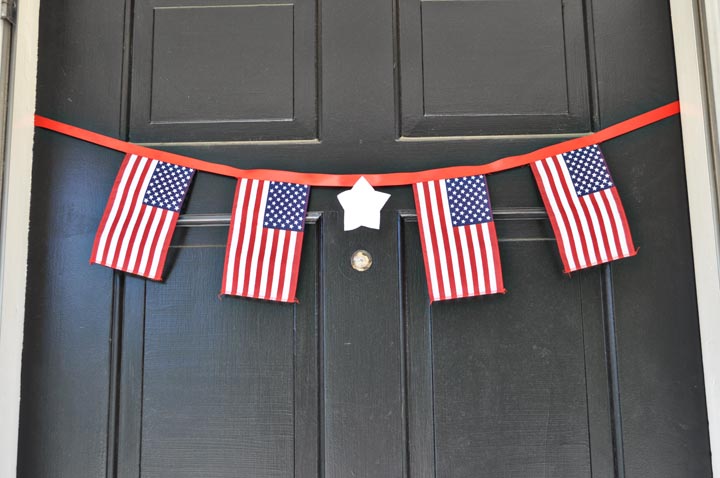
Um, hi. I have gone missing again. At least I have been working on projects while ignoring you. :) I've never been great at having cutesy things on my door, but I like the look of a nice wreath, etc. It seems like I get more and more happy for the 4th of July every year and I've finally done something to show my feelings...
It's simplistic, but does the trick. And It was easy and cheap! I just bought a 4 pack of flags at Wal-Mart for $1 (or where ever you like, but some have less in the pack for the same cost), removed the "pole" and glued the flags on a ribbon. The fabric star in the middle I plan to replace with something a little studier, or maybe fabric again but double-sided to make it stronger and less likely to curl on the edges.
The little banner on the door was definitely a great addition to the two measly flags hanging out by the steps. Someday I'd love to have a bigger house and decorate it all nice and have the fun patriotic swag banners outside from Flag Day to Independence day. But for now, I am happy with how I have set up our doorstep.

Friday, May 21, 2010

Necklace Projects

Remember when I said I was going to make these necklaces? Well, I did awhile back and I just haven't posted yet. I found the pearl ribbon necklace here.I pretty much just did a practice run with the necklace to prep for teaching the girls, but I haven't tried to perfect it.
Here are the basic supplies needed. You could use any kind of bead and there are lots of styles of ribbon to choose from. I imagine there are a lot of methods to actually stringing the beads. I just tried out different distances between beads to get different effects.
I actually don't know that this is something that I will really wear much, but it was fun to trey something new. More importantly, the girls I was helping make them seemed to like it, despite the challenge it was for them.
The other necklace project was the stamped washer necklace. I have not made these with the girls, and so far my first attempt was my best. I used this tutorial.
I liked that I had colored Sharpies and so there were more options to choose from to fill the letters in. Also, if you notice, the first "e" is a little shallow. You can go back and res-tamp it to get it deeper, just make sure you line it up all nice and tight.
And I'd recommend doing your stamping on concrete so it is extra solid, just make sure to put something behind the washer so it doesn't get all scratchy on the back.
String it up, add a clasp (on in my case two knots so it can slide to different lengths) and you are good to go.

Wednesday, January 20, 2010

My Sewing Space

I always like looking at pictures online of where people accomplish their sewing or other similar projects. I wouldn't call my work area a craft or sewing room. It's more of, well, a sewing space and not a pretty one.

It is in our unfinished basement. The "walls" are made of book shelves and the "door" is a piece of Masonite to keep our cats out. The concrete walls are an ugly green that the former owner painted (the ironing board cover matching is purely incidental). In fact, they painted ALL of the concrete walls in the basement green. I'd paint over them to make them look nicer, but we actually need to find a way to get the paint OFF the walls entirely so we can seal them and get working on finishing the basement. But that is another subject entirely.
I have pretty much all the supplies and lighting I need. A sturdier table would be awesome, as the bounciness of the card table can get annoying. If I have a big project I will move upstairs to the kitchen table. Plus, then I can work during the day when the kids are awake.

I am certainly not lacking in my fabric stash. Sadly, it's more of an unfinished project stash. I bought all of this with the intention of making a bunch of blankets to sell and have stashed away for baby gifts. I have dozens of excuses or not working on them - I don't like sharing my sewing space with the place I have to do my work from home job at, it's too cold, my ruler for cutting binding is lost (true story until yesterday), don't have times, etc. The truth is that I just get so excited about the idea of a project that the actual working on it is a bit of a disappointment. But I am pleased about 95% of the time when I am all done and wonder why I don't sew more.
So, I've got some goals and am currently working on a time sensitive project. I have a few things I made for the kids for Christmas, that if I could get them to pose in I could get a post written up. And there are a few other projects I haven't posted either that I am hoping to get to relatively soon.

Tuesday, December 23, 2008

Felt Sandwiches

I have been seeing felt food on sewing blog after sewing blog. I knew I had to make some and now I have! My mom is getting some toy dishes from me for Christmas and I wanted to add a little more to the gift. Felt food seemed like the perfect match.
I had ordered a pack of assorted felt online from JoAnn Fabrics. When it arrived I was a bit disappointed because about half of it was weird carpet-like "felt." However, I realized it would make great bread.
I based the size of my pieces on her dishes, so all of it is smaller than the real food version. I hand-stitched each piece. It would have been faster with a machine, but I liked the old fashioned feel of pulling the needle and thread myself. I plan on making some more sandwiches and some other foods for my boys.

Monday, October 20, 2008

Spooky Spoons

This is about as traditional craft as I will go. I thought this was a cute idea and thinking I would let my kids use them as puppets made the project a go.
This monster was completely my creation - no copying another idea. I think he complimented the spooky guys well and added some more color...

Sunday, September 28, 2008

Block Lamp

Before my first son was born, I decided I wanted to make his decor instead of by it. We picked blocks as a sort of theme. I looked up lamp making online and created this with some help. The lamp elements (cord, switch, etc) came from an old lamp (you can also buy new sets at places like Home Depot). The blocks were from the dollar store or something similar and the shade was from Michael's. The base was some pre-cut piece of wood my dad had lying around in his shop. My husband drilled holes in most of the blocks for me to make the stem of the lamp. I used wood glue to glue them together and glued the extra stacked block in front. I was going to fancy up the shade a bit, but never got around to it and sort of like the simplicity of it as it.

Tuesday, September 16, 2008

Marble Picture Magnets

This picture is not the greatest. I made a set of these magnets for my mom and my mother-in-law for Mother's day a few years ago. I got my instructions from Not Martha. I though it would be fun for the moms to have magnets that were pictures of all their kids/spouses and grandkids. They were really fun to make. If I was the kind of person who had magnets on their fridge I would make more for me.
To make them I measured the diameter of the marble and then used Photoshop to size down all of my photo. I put them all on one document and had them printed at Costco. The rest was about the same as Not Martha did.