Showing posts with label skirts. Show all posts

Sunday, June 23, 2013

[Project from the Past]: Buncha Baby Clothes Part 2

The pictures for the next outfit are pretty bad. Sorry about that, but I can't go back in time to change them. This was a gift for my cousin who was having her first baby.
The top probably looks pretty familiar, but this time in white. I made the ballet skirt a little less full on this version.
To go with it I made this knit skirt. I just eyeballed it and fake surged the edges for a rough sort of look.
I added on three little rose-like flowers made out of some of the tulle to match the skirt on the shirt.
This is not one of my best gifts. Sorry, friend. The shirt was a basic applique. And the shoes were my first (and so far only) attempt at these Kimono Booties.
They came together easier enough, but I decided I didn't like my fabric choices (the inside sole was fleece, the rest cotton) and that they didn't seem to lay just right. I never got feedback about them so they might have been just fine on a person (just as likely they were weird and never got used!). I do want to try this pattern out again.
This was another gift for another cousin (I have a LOT of cousins). I didn't have a lot of time, but still though the end gift was pretty cute.
I grabbed a onesie from my massive stack of plain white onesies - all prewashed and ready to go for gift making.
I cut strips of knit (my favorite material for this sort of thing) and gathered them into ruffles. A few quick lines of stitching to attach them and the baby gift was done!
This one might seem out of place with the rest of these. My brother's wife was pregnant with their first boy. My brother loves Ice Cube and I spent many hours listening to it in the car with him as a teenager. I had been wanting to try out this photo transfer idea from Little Blue Boo. It worked pretty well. I think something more like a line drawing than a photo would work better, but I still like how it turned out. (The photos are horrible.)
This last project was actually done quite recently. My son's kindergarten teacher, whom we loved, was pregnant and I wanted to give her something thoughtful. This is what I came up with.
My son is always drawing. He's good too. On his school assignments his pictures of animals (and later army guys) would fill the margins of the paper. So, I scanned in one of his drawings to use it as a shirt design. I cleaned up the color and darkened the edges so that I could trace it onto pellon. I then ironed the pellon on the shirt and carefully stitched along the lines.
Here's how it turned out. I probably should have used a more contrasting thread color, but I was still pleased and surprised how easy this actually was to do.

Tuesday, September 25, 2012

T-shirts into Maternity Clothes

I've only got a month - plus or minus left to go with the baby. I do not plan on having anymore, but I still didn't want to only use my maternity wardrobe I already had. Well, that and this is the first time I have been this pregnant in warm weather and all summer long. So, I did need to add a few items, since sweaters don't work too well during a summer full of days with record breaking heat. I am so glad it has cooled down now. Fall is the best!
Not wanting to splend a lot of money, I bought a few $5 men's XL shirts from Target and had a few already on hand from clearance sales at Old Navy that I had intended to freezer paper stencil for my husband.) This pink one was one I tried bleach spraying with. The ones I made the boys turned out better, but this still worked for me. Before I started though, I traced a maternity t-shirt I love and cut the sides of the shirt so it would be more tapered and less boxy than a standard t-shit at the top. I cut off the collar and had to do two little pleats, as I think I cut it a little too low and it was gaping a bit. I tapered and shortened the sleeves too. It's been a comfy shirt to wear.
I had one more shirt I was going to maternity-ize too, but I'm so close to the end, that I will just save it for normal sized me.
This, along with my other t-shirt skirts I made with the intention of making them work post-baby too. I love all of them and they really are super easy to make. I don't have a step by step tutorial or anything like that to show you, but I sort of explain how I made my green one in this post.
I wanted to mix up my hem lines so all the skirts didn't' look exactly the same. The green one got a ruffle and this one got...I don't know what to call them. Petals? Weird circles? Anyway, it was inspired by this skirt. All I did was cut out a whole bunch of circles out of the left over red fabric. (A contrasting color would be fun too.) I arranged them on the skirt, sometimes as singles, other times 2-3 in a layer. I pinned them down and then just started sewing them on, making a simple "x" over each. I varied which way the x's went. As it get washed they change and curl a little - which was the point.
Here's the last t-shirt skirt. I used the same basic principles before, but changed the hem again. And sorry the pictures are terrible. For some reason it was tricky to photograph it, The shirt is just a regular brown color. Anyway, I tried the lettuce hem technique that I read about here. I just had a zig-zag stitch, so it's not super ruffly, but it works.
  This was a shirt I picked up at the thrift store. It was actually a maternity shirt and I could have just keep it that way, but I really wanted a striped skirt and as a shirt I think it would have been too big. I just cut an a-line shape out of it, re-matched the stripes up (sort of a pain, but I always things it looks much better to have your stripes align on the sides and worth the effort.) Using both Ashley and Dana's instructions on exposed elastic waistbands, I just added some wide black elastic.
I did the same here for a skirt I'd previously made to fit a pregnant me. The knit I used for the old waistband didn't hold it's stretch and eventually was useless and annoying.
The good thing about both of these, is that I will be able to use them post baby, at some point needing to shorten the elastic for a better fit.
And this is not from a t-shirt nor nothing I made recently, though it is recent-ish me. I used a pattern to sew this when I was pregnant with my now 6.5 year old. I never liked it and it has since been donated, but I do like to document all of my projects, so here it is! I think if I were to make it now with my more improved skills, it could have been better. I do not remember what pattern it was from.

Monday, July 16, 2012

Green Shirt to Skirt

 Sometimes I chuckle when I read about people not having done mending in 6 months or having an unfinished project from last year because that is my life. I have pictures for posts I meant to put up from several years ago. I have projects that have been sitting around that long too - untouched. For example, my daughter turned 2 a couple of weeks ago and I had bought this green shirt when I was pregnant with her.
 As you can see in the picture, I am a hefty 29-ish weeks along wearing the XL men's shirt to show the before picture. And the shirt just sat in a pile until last week. I got on a random sewing kick for a couple of days (the other projects are nearly done) and I actually started and completed the shirt to skirt project in one sitting. Go me!
And I LOVE the after. I have been wanting a green skirt since seeing this one. I actually found one to alter at the thrift store, but being pregnant (I'm 26 week along) doesn't really help a person alter clothes to fit their regular size. So, I needed a solution in the meantime (and something I could wear later too).
Then I saw this one on Delia Creates (who I met in January when I helped at Dana's class and she was so cute. I STILL haven't blogged about that - see? unfinished posts!)and was going to do the whole black elastic band thing, but realized I wanted it solid green so I can put it together with a shirt and have it look like a green dress.
So, I folded my big manly shirt in half and used a combo of these two skirts (one from Target and the other from Old Navy) and made...
This! So comfy and super easy (though the ruffle did take a bit of time. I sewed part of it too tight and it took longer than normal to gather.) 
 I made the waistband with the sleeves. I was hoping I would have enough to enable it to fold over like the Old Navy version, but I didn't. I still love it though.
And now I have a green skirt! I tried it out with a black and white shirt and already have a few other shirts in mind to wear it with, which is a sign of picking out the right color (which sometimes I don't).

Monday, July 11, 2011

Matchy-Matchy

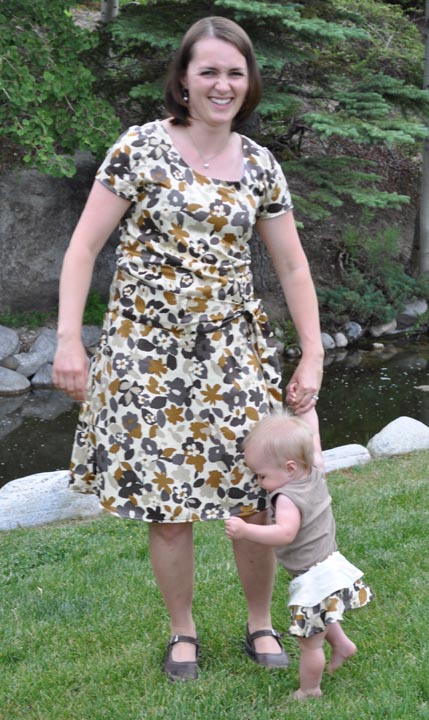
When my older sister was a little girl my mom used to make them matching outfits. I've always thought they looked cute when I looked through the pictures of them. When I decided that I was going to make a dress for my brother-in-law's wedding, I knew I had to make my baby girl something to match.
Wanting both outfits to be simple, I decided to make a skirt for her using one she already had as a guide. Lucky for me I found a cute and a little bit fancy brown onesie at Carter's on clearance.
The brown in the skirt fabric and onesie didn't go perfectly together, but the layer of cream helped make that less noticeable. That, and it also made out matching not stand out as much. There is a waistband out of the flowered fabric, but it turned out a little more narrow than I wished.
As for my dress, my simple solution was to make a "seams" dress. I wanted a new dress in a hurry years ago and saw that my mom had a "1 hour" pattern. It was McCall's 7725. It was meant for knit, but we ignored that and made it out of some kind of Rayon or something (sorry, I'm not super great at knowing all my fibers). That is the above dress. We nicknamed that style a "seams" dress because you could see the black thread along the sides of the original version, like the tension wasn't tight enough on the serger and the threads were a little too loose. Since we made this dress I ignore the "knit only" rule on some patterns. However, that doesn't work for all body types.
I was skinnier back then and the pattern I had cut was too small, so lucky for my I found a bigger size on ebay! I whipped the dress up super quick and added a sash around the waist. I'm excited to have the pattern again because it is so easy to make!

Monday, February 22, 2010

T-Shirts Into Skirt

Another catch-up posting. This was a project I did last summer. 
 It started as one half of this (the other half is waiting for it's revamping still).
I had seen several skirts similar to this in the store and tutorials online. I decided it would be a nice addition to my summer wardrobe. I didn't follow one particular blog's idea, but meshed a few together. After cutting my strips for each tier of the skirt. I basted the bottom of each and then pulled one of the strings to sort of tighten it all up. 
Sadly on the botom layer I tightened it a bit too much losing the tier's a-line look and crating more of a balloon. Easily fixable, but I was pretty far into the project when I noticed, so I just deal with it. (This is the only picture I have of me wearing it and would have put it on for a new picture, but I think I'm a little pregnant for that now.)

I used elastic thread to make tighten the waist. It sits perfectly comfortable just above my hips (and using the bottom on the original t-shirt saved me an extra step).
I wanted it to be sort of rough around the edges. I love how the layers looked with the raw edge showing. It was a much trickier task for me than just a normal seam would be.
The hem is also still rough and I like how it curls up a bit along the edge.

It is so comfy that I might try another that will fit my preggo body better. I think I will skip the rough seams to save myself some time. I would also definitely make sure I get the a-line, not the semi-tulip thing going on.

Monday, November 30, 2009

A Summer Skirt

There is snow on the ground and I'm writing about summer? I'm still just working on catching up on some old projects. I loved this fabric because it was so bright and matched several shirts in my closet.
This one actually started a couple of years ago. It was all cut out and nearly ready to go. The main thing holding me back was a drawstring to go through the rivets on the front.
I just couldn't make one small enough, so I changed the front a little. I had to cut out the rivets which left a big hole. I just covered it with a little square of fabric and laced my drawstring through (probably could have made a longer drawstring).

I really like how it turned out. The only problem is how the waistband lays on my waist in the back. I think I may do a combo of elastic and drawstring next time and see if that helps.
 I used this pattern, Simplicity 7229.
Several years ago I also made these capris that I love from that pattern too. (And a pair of camouflage shorts that ended up being too big.)

Sunday, September 7, 2008

White Skirt

This was another simple skirt. I used an idea similar to the Easy Skirt, but the width of it allowed me to make an a-line skirt.

Gray Skirt

This is one of the few things I have made without a pattern. I got the rough shape from another skirt. The first time around it was too small, so I added side panels with slits. So, on each side there was a double slit. I liked the end product a lot.

Easy Skirt

This skirt was one my mom taught me how to make that i think you could do with your eyes closed. You just measure your widest part (likely your hips) and add an inch or two. If that number is less than 45 than you just have to decide how long you want your skirt. Add another couple inches and then that's what you have them cut from the bolt. So, if you are in the store and see fabric you love, you can just hold it up to you and know right there how much you need. Sew the sides together (I often make side slits in mine), hem the top with room for a drawstring (or elastic) and hem the bottom. Super easy and fast! This fabric was some that my mom had lying around. It may have been my grandma or great grandma's.